
HTConnect Support
How can we help?
Find help for internet and NBN, mobile and travel eSIM, BizCloud PBX, domains, websites, email and your account.
Browse help topics
Getting Started & Account
Internet & NBN
Mobile & Travel eSIM
Business Phone & PBX
Domains, Websites & Email
Legal & Service Documents
Basic Grandstream Handset Installation:
Video Tutorials: Unblocking 2636 , 2061
-
Unboxing and Preparation: Unbox your Grandstream handset and ensure that all necessary components are present, including the handset, base station, power adapter, and any cables.
-
Power Connection: Connect the power adapter to the base station and plug it into a power outlet. Allow the base station to power up fully.
-
Handset Registration: Depending on the model, you may need to register your handset with the base station. This typically involves pressing a registration button on the base station and then following on-screen instructions on the handset.
-
Language and Time Setup: Once the handset is registered, you may be prompted to select the language and set the time/date. Follow the on-screen instructions to complete this setup.
-
Network Connection: If you're connecting the handset to a Wi-Fi network, proceed to the next set of steps. If you're using a wired Ethernet connection, simply connect an Ethernet cable from the base station to your router or switch.
Connecting to a Wi-Fi Network Using the Handset:
Video Tutorials: How to Setup WIFI
-
Access Wi-Fi Settings: On the handset, navigate to the menu or settings section. This may be accessed through a dedicated button or through the handset's interface.
-
Select Wi-Fi Setup: Within the settings menu, look for an option related to Wi-Fi setup or network settings. Select this option.
-
Scan for Networks: The handset should now scan for available Wi-Fi networks. Once the scan is complete, a list of available networks should be displayed on the screen.
-
Choose Network: Select your desired Wi-Fi network from the list. If the network is password-protected, you'll be prompted to enter the Wi-Fi password using the handset's keyboard.
-
Enter Wi-Fi Password: Using the handset's keyboard, carefully enter the password for the selected Wi-Fi network. Take your time to ensure accuracy, as incorrect passwords will prevent successful connection.
-
Connect: After entering the password, select the option to connect to the Wi-Fi network. The handset will attempt to establish a connection using the provided credentials.
-
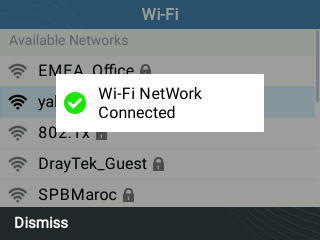
Confirmation: Once connected, the handset should display a confirmation message indicating successful connection to the Wi-Fi network. You should now be able to use the handset over the Wi-Fi connection.
-
Testing: Test the Wi-Fi connection by placing a call or accessing online features if available. Ensure that the connection is stable and reliable.
Wifi connection with pictures :
To do this, first ensure you know the network name and password for your WiFi, and that the handset's power has been connected, then perform the following:
1. Select Menu and navigate to System -> Wi-Fi settings.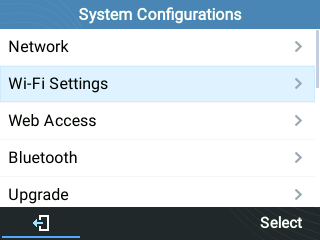
2. Set Wi-Fi to “Enabled” and press “Save”.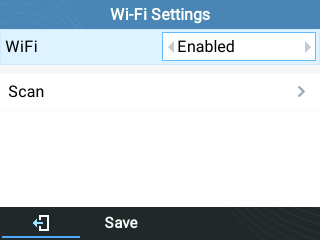
3. Select “Scan”.
The device will automatically start scanning for Wi-Fi access points within range
4. A list of available Wi-Fi networks will be displayed. Use the arrow keys to select your network, then press connect.
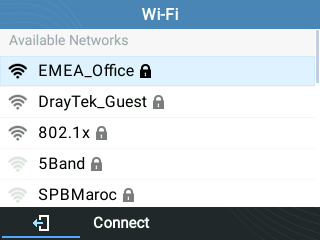
5. If your network has a password, enter it using the keypad, then press OK to connect.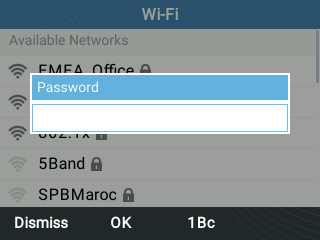
An incorrect password will trigger an error message “Cannot connect to the selected network”.
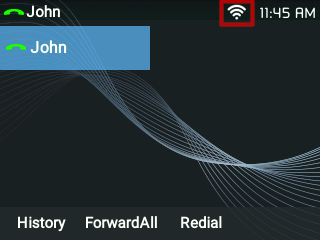
If the connection is successful, you'll see the following:
 EN
EN
 ZH
ZH