
HTConnect Support
How can we help?
Find help for internet and NBN, mobile and travel eSIM, BizCloud PBX, domains, websites, email and your account.
Browse help topics
Getting Started & Account
Internet & NBN
Mobile & Travel eSIM
Business Phone & PBX
Domains, Websites & Email
Legal & Service Documents
Youtube Link https://youtu.be/g5j7ILjx-BI
Official link from Apple.com https://support.apple.com/en-au/guide/iphone/iph3f11fba92/ios
Set up cellular service on iPhone
Your iPhone needs a physical SIM or an eSIM to connect to a cellular network. (Not all options are available on all models or in all countries and regions. On iPhone 14 and later models purchased in the U.S., you can only use eSIM.) Contact your carrier to get a SIM and set up cellular service.
Set up an eSIM
Supported iPhone models can digitally store an eSIM provided by your carrier. If your carrier supports either eSIM Carrier Activation or eSIM Quick Transfer, you can turn on your iPhone and follow the instructions to activate your eSIM during setup.
If you already completed setup, do the following:
-
Make sure your iPhone is connected to an available Wi-Fi or cellular network. eSIM setup requires an internet connection.
-
Add an eSim using one of the following methods:
-
eSIM Carrier Activation: Some carriers can assign a new eSIM directly to your iPhone; contact your carrier to initiate this process. When you receive the “Finish Setting Up Cellular” notification, tap it. Or go to Settings
 > Cellular, then tap Set Up Cellular or Add eSIM.
 -
eSIM Quick Transfer: Some carriers support transferring a phone number from your previous iPhone to your new iPhone without needing to contact them (requires iOS 16 or later on both devices).
On your new iPhone, go to Settings > Cellular, tap Set Up Cellular or Add eSIM, then tap Transfer From Nearby iPhone or choose a phone number. On your previous iPhone, follow the instructions to confirm the transfer.
Note: After your phone number is transferred to your new iPhone, it stops working on your previous iPhone.
-
Scan a QR Code provided by your carrier: Go to Settings > Cellular, tap Set Up Cellular or Add eSIM, then tap Use QR Code. (You may need to tap Other Options first.) Position iPhone so the QR code appears in the frame, or enter the details manually. You may be asked to enter a confirmation code provided by your carrier.
-
Transfer from a different smartphone: If your previous phone isn’t an Apple iPhone, contact your carrier to transfer the phone number.
-
Activate service through a participating carrier’s app: Go to the App Store, download the carrier’s app, then use the app to activate cellular service.
-
-
To verify the eSIM is activated, go to Settings > Cellular, then make sure the new line (below eSIMs) is turned on.
For troubleshooting steps, see the Apple Support article If you can’t set up an eSIM on your iPhone.
Install a physical SIM
You can get a nano-SIM card from a carrier or move it from your previous iPhone.
Note: Physical SIM isn’t supported on iPhone 14 and later models purchased in the U.S.
-
Insert a paper clip or SIM eject tool into the small hole of the SIM tray, then push in toward iPhone to eject the tray.
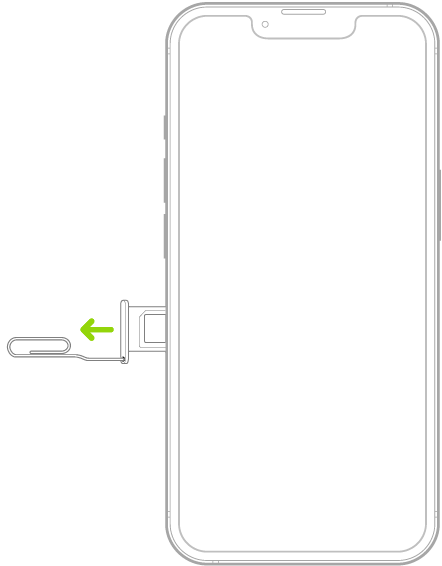
Note: The shape and orientation of the SIM tray depend on the iPhone model and your country or region.
-
Remove the tray from iPhone.
-
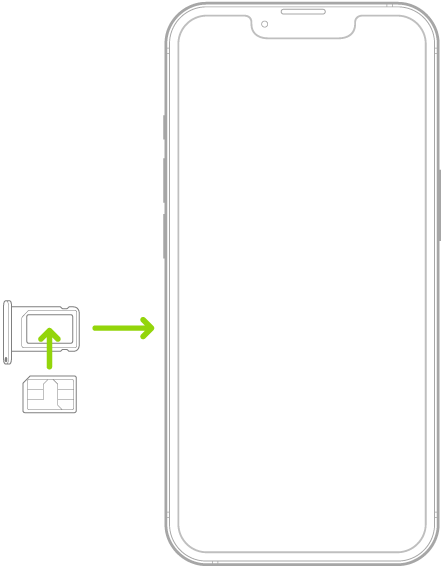
Place the SIM in the tray. The angled corner determines the correct orientation.
-
Insert the tray back into iPhone.
-
If you previously set up a PIN on the SIM, carefully enter the PIN when prompted.
WARNING: Never try to guess a SIM PIN. An incorrect guess can permanently lock your SIM, and you won’t be able to make phone calls or use cellular data through your carrier until you get a new SIM. See the Apple Support article Use a SIM PIN for your iPhone or iPad.
Convert a physical SIM to an eSIM
If your carrier supports it, you can convert a physical SIM to an eSIM on a supported iPhone model.
-
Go to Settings
> Cellular, tap Set Up Cellular or Add eSIM, then choose the phone number with a physical SIM. -
Tap Convert to eSIM, then follow the onscreen instructions.
Important: The availability of cellular capabilities depends on the wireless network, your iPhone model, and your location.
Consider applicable data, voice, and roaming charges when managing your cellular plans, especially when you travel with iPhone. See View or change cellular data settings.
Some carriers let you unlock iPhone for use with another carrier (additional fees may apply). Contact your carrier for authorization and setup information. See the Apple Support article How to unlock your iPhone for use with a different carrier.
 EN
EN